Table of Contents
Are you wondering how to make a Chrome extension from scratch? If you have never done extensions in development before. Or even if you have no developer experience in web technology. It is time to create your first Google Chrome Extension Manifest V3 for Beginners. And that in a few minutes (with copy and paste).
In this post, I will explain to you the anatomy of the Chrome extension. Next, I will walk you through the first steps to make this without any special frameworks (like Node.JS, NPM, or ESlint). Just with a simple text editor or Visual Studio Code. You will then know how to create a Chrome extension in 10 minutes flat. It includes interactive links to download those files. Such as the image and icon file.
When you create your first Chrome extension, you need to fulfill a single purpose in the Chrome extension. And that it is easy to understand and makes the web experience comfortable. For example, a single purpose is to dim the web page with one click of a button. Another purpose is to get one click on the current full date and time in the popup window. In addition, the user interfaces should be minimal and have a clear intent for the user.
Development of a Google Chrome extension Manifest V3 for beginners
Building blocks of a Chrome browser extension
A Chrome extension is built with many components. Here is an architecture overview of what component can be included in an extension:
- Manifest
- User Interface Element
- Content Script
- Background Script
- Options Page
Let us discuss each of the components one by one:
Manifest
This is one of the important files of your Chrome extension Manifest V3. Here is an overview of what you can do with this file.
Properties
The manifest.json is a JSON Object Structure format that tells the action of the extension. There are properties required to run this Chrome extension in your Chrome web browser. And there are optional features that all depend on the kind of Chrome extension you want to build for your users.
Required properties
{
    "manifest_version": 3,
    "name": "My name",
"version": "1.0",namethe string name of your Chrome extension which is limited to up to 45 charactersversionone to four dot-separated integers identifying the version of this extension. For example, 1.0.0.0manifest_versionthe version of the manifest technologyhost_permissionsthat is the list of URLs where the extension may be running on that website. This is a new property that is for manifest V3
Google Chrome extension Manifest V3 for beginners must use the recommended properties:
Recommends properties
    "action": {
        "default_icon": {
            "19": "images/icon19.png",
            "38": "images/icon38.png"
        },
        "default_title": "My name",
        "default_popup": "popup.html"
    },
    "default_locale": "en",
    "description": "Screenshot my current screen",
    "icons": {
        "16": "images/icon16.png",
        "24": "images/icon24.png",
        "32": "images/icon32.png",
        "48": "images/icon48.png",
        "96": "images/icon96.png",
        "128": "images/icon128.png"
},actionthe property to set your browser button action in your Chrome toolbar. Here you can choose the default icon, title, and default popup page that should be visible when you click this icondefault_localeto set your default language of the Chrome extension. When you have a multi-language Chrome extension that includesen(English),nl(Dutch),fr(French),de(German). For example, if your French language file does not have a French-translated string, then it goes to the default language string of the English version.descriptionthat describes this extension functionality. In Google Chrome thedescriptiontext is limited to 132 characters. However, in Safari thedescriptiontext is limited to 112 characters See this W3 Extension issue I reported.iconsshowing the different formats to display this extension icon. That can be visible in the extension panel to the extension favicon
Optional properties
These are the optional properties that depend on whether you want to build the extension further for the users.
    "author": "Stefan vd",
    "background": {
        "service_worker": "background.js",
    },
    "permissions": ["storage", "activeTab"],
    "host_permissions": ["https://*.youtube.com/*"],
"short_name": "S",authorthis property gives the author name of this extensionbackgroundthis is the script that listens to the event and communicates from your content script and popup page and vice versa. It is the first script installed to detect the first or update to a new extension versionpermissionsis the list of actions a Chrome extension can do, for example, write your settings tostorage, only works on the current tab withactiveTaband other permissions. However, keep it to a minimum to get the best and safest experience for the usershort_namethe string name with a minimum of 1 character and a maximum of 45 characters
    "web_accessible_resources": [
        {
            "resources": [
            "image/add.png",
            "image/edit.png",
            "image/remove.png"
            ],
            "matches": ["https://*.stefanvd.net/*"]
        }
],web_accessible_resourcesthis property declares which resources such as images are exposed and that match the website regex URL
    "content_scripts": [
        {
            "matches": ["https://*.stefanvd.net/*"],
            "js": ["content.js"]
        }
    ]
}content_scriptsthis is an array of scripts that are allowed to manipulate the page DOM and run in the context of a matches website regex URL
Where must I save this manifest.json file?
The manifest.json must be saved in the root of the folder of your extension project.
Example code
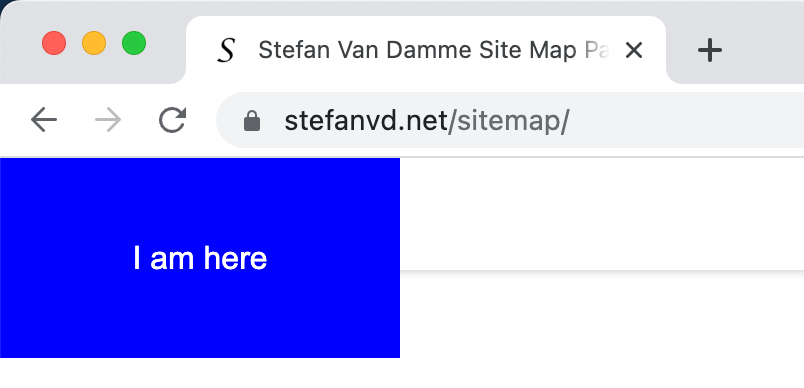
In this tutorial, we are going to create a Chrome extension that, with a single click on its icon in the toolbar, will open a popup window and show you the current date and time. When you visit a particular website, a blue rectangle is added at the top left of the webpage.
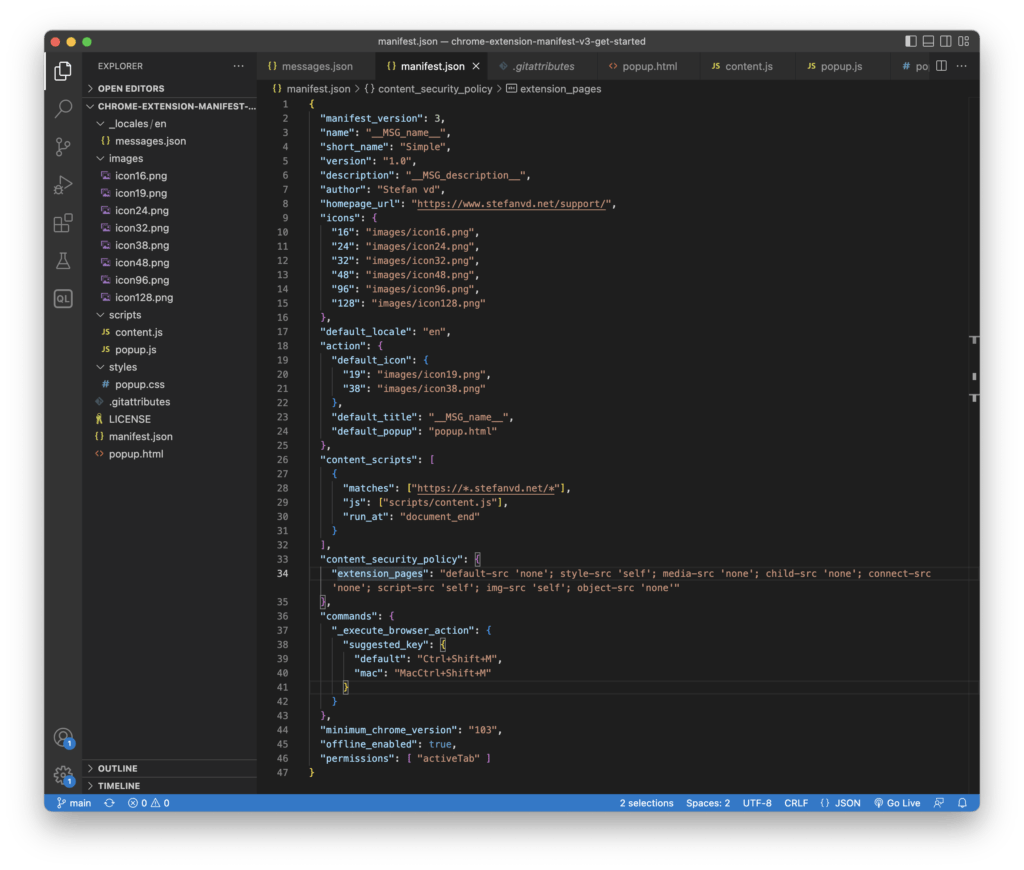
So open your Visual Studio Code application and create a new project folder. For example, “Simple-Chrome Extension“. That will be your work folder. In this root folder, create the “manifest.json” file and add the following code:
{
  "manifest_version": 3,
  "name": "__MSG_name__",
  "short_name": "Simple",
  "version": "1.0",
  "description": "__MSG_description__",
  "author": "Stefan vd",
  "homepage_url": "https://www.stefanvd.net/support/",
  "icons": {
    "16": "images/icon16.png",
    "24": "images/icon24.png",
    "32": "images/icon32.png",
    "48": "images/icon48.png",
    "96": "images/icon96.png",
    "128": "images/icon128.png"
  },
  "default_locale": "en",
  "action": {
    "default_icon": {
      "19": "images/icon19.png",
      "38": "images/icon38.png"
    },
    "default_title": "__MSG_name__",
    "default_popup": "popup.html"
  },
  "content_scripts": [
    {
      "matches": ["https://*.stefanvd.net/*"],
      "js": ["scripts/content.js"],
      "run_at": "document_end"
    }
  ],
  "content_security_policy": {
    "extension_pages": "default-src 'none'; style-src 'self'; media-src 'none'; child-src 'none'; connect-src 'none'; script-src 'self'; img-src 'self'; object-src 'none'"
  },
  "commands": {
    "_execute_browser_action": {
      "suggested_key": {
        "default": "Ctrl+Shift+M",
        "mac": "MacCtrl+Shift+M"
      }
    }
  },
  "minimum_chrome_version": "103",
  "offline_enabled": true,
  "permissions": [ "activeTab" ]
}
In your Visual Studio Code application you will see the code as follows:

Next, create a new folder with the name “images“. Then download and place all these images in this folder: icon16.png, icon19.png, icon24.png, icon32.png, icon38.png, icon48.png, icon96.png, and icon128.png.
message.json
Now create a new folder called “_locales“. This is where all your localization strings are stored according to that language. In this folder “_locales” create a new folder “en“, that is for the English original strings. And then in this “en” create the file name “messages.json“, which will contain all strings with JSON object structure.
{
    "name": {"message": "Simple"},
    "description": {"message": "Chrome extension Manifest V3 Tutorial"}
}
The English messages.json file.
Button Action
Now we are going to get the files ready for when you click the button in your Chrome toolbar.
Example code
popup.html
On the root folder of your work project, create a new file named “popup.html“. That will represent the front web page of the popup panel.
<!DOCTYPE html>
<html lang="en">
<head>
<meta charset="utf-8">
<link rel="stylesheet" type="text/css" href="styles/popup.css">
<script type="text/javascript" src="scripts/popup.js"></script>
<body>
Hello World
<br>
<div id="date"></div>
</body>
</html>
The popup.html file.
To see the contents, go to your project folder and double-click on “popup.html” to open it in your Chrome web browser. Here, the design of this webpage will always be visible, so you can use the Chrome Inspector tool to design and improve the code. Or when the extension is loaded in your developer mode, click on the extension button to open the popup panel. And then click right on this popup panel, and click the menu item Inspect.
popup.js
Now create a folder “scripts“, and then with a new file name “popup.js“. This is the logic that shows the current date in the popup window, only when the Document Object Model (DOM) has been loaded completely. Then the init function will run and find that ID element named “date”, and provide the text content of the current date and time.
document.addEventListener("DOMContentLoaded", init);

function init(){
     document.getElementById("date").textContent = new Date();
}
The popup.js file.
styles.css
In your work project, create a new folder called “styles“. That gives the right design for that popup panel. That includes the font size, background color, and the minimum width and height for that popup panel.
html{min-width:435px;min-height:180px;padding:0;margin:0}
body{background:white;color:black;font-size:12px}
#date{font-size:24px;color:blue}
The styles.css file.
Content script
The content script is whatever the name states, it will add the script with the current web page content. So you can interact with the content of that web page. For example, you can detect the status of the video player or change the color of a text when the page loads.
Example code
Create a new file named “content.js” and place it in your “scripts” folder. This is the vanilla JavaScript code that creates a blue rectangle on the current web page.
var newdiv = document.createElement("div");
newdiv.id = "hellothere";
newdiv.style.background = "blue";
newdiv.style.color = "white";
newdiv.style.zIndex = 1000;
newdiv.style.position = "absolute";
newdiv.style.top = 0;
newdiv.style.left = 0;
newdiv.style.width = "200px";
newdiv.style.height = "100px";
newdiv.style.display = "flex";
newdiv.style.justifyContent = "center";
newdiv.style.alignItems = "center";
newdiv.innerText = "I am here";
document.body.appendChild(newdiv)
The content file.
When you open any of my stefanvd.net pages, you will see this blue rectangle on the top left corner of the web page.

Events page
The service worker is the heart of your Chrome extension. This ensures that the communication from the popup goes to the background, to the content script, and vice versus.
As I mentioned in my previous blog, there are some limitations when using the service worker with the previous HTML event page (which was for Manifest V2). When migrating to this new background context, keep two important things in mind. First, a service worker is terminated when not in use and restarted when needed (similar to event pages). Second, a service worker does not have access to DOM.
Here in this tutorial, we do not need a background script. But you can use it to make the browser button popup page dynamic, change the button icon, etc.
Complete structure
With a good structure, you can make maintenance of a Chrome extension very easy later and in the future. So this is how your file structures should be. An example structure for folders and files:
- _locales / en / message.json
- _locales / nl / message.json
- _locales / fr / message.json
- _locales / de / message.json
- images/ .png or .webp or .jpg files
- scripts / .js files
- styles / .css files
- manifest.json, .html files, and LICENSE
In your first Chrome extension from scratch, you will get this:
- _locales → en → message.json
- images → icon19.png and icon38.png
- scripts → content.js and popup.js
- styles → popup.css
- In the root folder of your project “manifest.json“. This is an important file to run this Chrome extension in your Chrome web browser. Then “popup.html” show the visual front of this popup panel. At last, the “LICENSE” provides the information that the code is Open-Source.
The complete tutorial code can be downloaded on the GitHub project page chrome-extension-manifest-v3-get-started.
Loading an unpacked extension
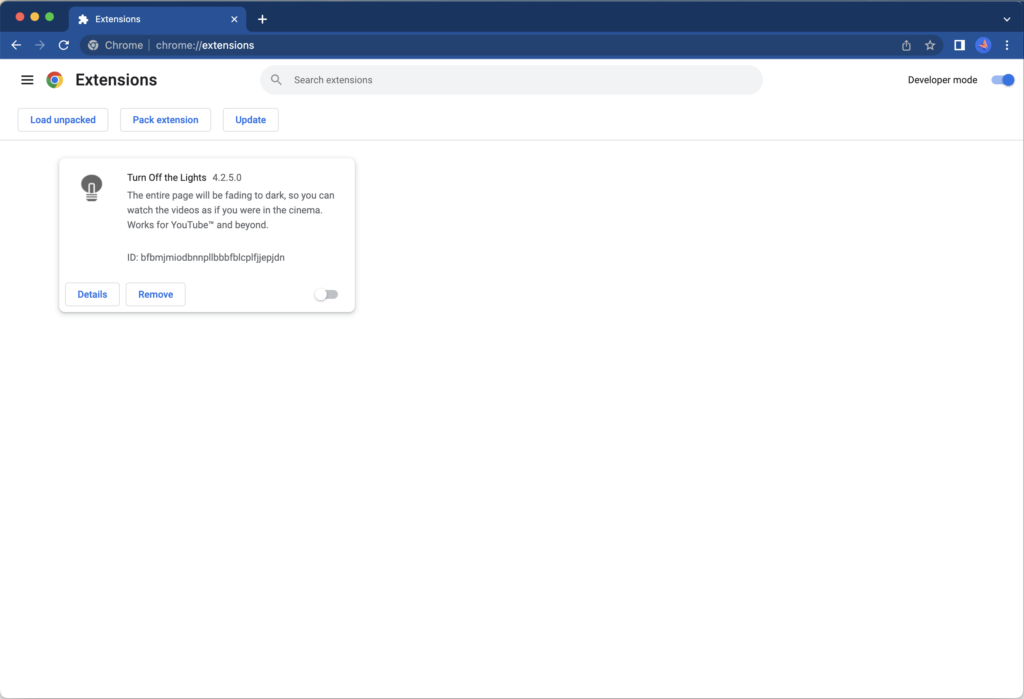
Now it is time to test your unpacked Chrome extension in developer mode. Follow the steps below to do that:
- Open your Google Chrome web browser, and go to the Extensions page by entering
chrome://extensionsin a new tab- Alternatively, click on the Extensions menu puzzle button and select Manage Extensions at the bottom of the menu
- Or, click the 3 dot icon, select the menu item More Tools, and then select Extensions
- Toggle the Developer mode switch that is visible on the top right of the web page
- Next, click on the button Load unpacked and select the extension directory

Publishing
When everything is ready and tested. You can publish your Chrome extension to the Chrome Web Store. For that, you have to pay a one-time activation fee of $5 to publish your Chrome extension. You can then publish up to 20 Chrome extensions in the Google Chrome Web Store.
To register your first developer account on the Chrome Web Store, just access the developer console. Next, follow the registration screen and agree to the developer agreement and policies. Then pay the registration fee. And you are ready to publish your first Chrome Extension to the Chrome Web Store.
Addition resource
These are handy resources for the Google Chrome extension Manifest V3 for beginners. To learn more about Chrome extension APIs and continue to create a creative experience for the users, see these resources:
- The Chrome extension template
- Chrome Developer Documentation
- Chrome Web Store Documentation
- MDN Browser Extensions
Final remarks
In my previous post, I provided a good development environment for building a Chrome extension. Manifest V3 has a good template for a quick start to writing consistent and clean code. That with removing the unnecessary “.DS_Store” files and the folder “node_modules”. And with the plugin to write your seamless and concise JSON, HTML, JavaScript, and CSS code. That with automatically beautify your CSS code. And one command to distribute your Chrome extension to a zip file.
In this article, you have learned to create from scratch a Google Chrome extension Manifest V3 for beginners. And that will answer the questions like where should I put my manifest.json, what is the “messages.json” file and how to see the contents of the “popup.html” without running it in the Chrome extension. That with a correct file and folder structure, and knowing where to save your file in your project.
Now developers can work to create a unique experience for their users as I did with my unique Chrome extension Turn Off the Lights. I hope you enjoyed my new tutorial post. If you would like to support me, consider a small donation to my web community work.
